[Guide to Fixing a Stopped-Up Shower & 3-Way Diverter Valve Replacement]
A shower that suddenly stops working can be frustrating. Whether the water won’t turn on, the pressure is low, or it only flows through one outlet, the culprit is often a faulty diverter valve or a blockage. Understanding the causes and how to fix a stopped-up shower will save time and money—possibly even a visit from the plumber.
Why Is My Shower Valve Not Turning On Water?
If your shower valve isn’t turning on the water, several issues may be involved:
1. Clogged Diverter Valve
Mineral deposits can clog the internal components, restricting water flow completely.
2. Worn-Out Washer or Cartridge
The rubber washer or cartridge inside the valve can deteriorate over time, making it difficult to open the water path.
3. Broken Handle Stem
If the handle rotates but doesn’t affect water flow, the stem connected to the valve may be stripped or broken.
4. Main Water Line Issues
If no water is coming through the valve, it could indicate a problem with the main water line or the shut-off valve.
Why Did My Shower Randomly Stop Working?
A functioning shower that suddenly stops working can indicate:
- Air in the line: Often after plumbing work or cold weather
- Sudden pressure drop: A pressure-balancing valve may shut off water if it detects irregularities
- Internal corrosion: Particularly in older plumbing systems
- Clogged showerhead: Debris or lime scale build-up
- Diverter valve failure: The most common reason for multi-outlet showers
How to Fix a Stopped-Up Shower
Here are simple steps to diagnose and fix a stopped-up shower before considering a replacement.
Step 1: Check Other Faucets
If all other faucets work fine, the issue is localized to the shower.
Step 2: Clean the Showerhead
Remove and soak the showerhead in vinegar to clear mineral deposits.
Step 3: Check the Diverter Valve
Turn the diverter to each position (e.g., showerhead, handheld, tub spout). If it’s stiff or doesn’t switch properly, it may be clogged or broken.
Step 4: Remove the Valve Trim Plate
- Shut off the water supply.
- Unscrew the handle and trim plate.
- Check for corrosion or sediment behind the escutcheon.
Step 5: Inspect the Cartridge
Pull out the cartridge and inspect for wear. Clean it with vinegar or replace if damaged.
Can I Replace a Shower Diverter Valve Myself?
Find a replacement for diverter valve
Yes, you can—but only if you’re comfortable with basic plumbing and cutting into the wall if necessary. Here’s what to consider:
✅ DIY is Possible If:
- You have access to the valve through an access panel
- You’re replacing a similar model
- You’re confident turning off the water supply and using plumbing tools
❌ Hire a Plumber If:
- You don’t have wall access
- You need to solder copper pipes
- You notice leaking from multiple areas
Replacement Cost of a Shower Diverter Valve
| Item | DIY Cost (USD) | Plumber Cost (USD) |
|---|---|---|
| 3-way diverter valve | $40–$150- check price-Amazon | Included in service |
| Tools and accessories | $20–$60 | – |
| Plumber labor (hourly) | – | $100–$250 |
| Drywall repair (optional) | $30–$100 | $50–$150 |
| Total Estimate | $60–$200 | $200–$500 |
Table: Top 3-Way Diverter Valves for Showers
| Brand/Model-Amazon link | Inlet/Outlet Type | Material | Installation Type | Price (USD) | Special Features |
|---|---|---|---|---|---|
| Delta R11000 | 1/2″ NPT | Brass | Behind wall | $70 | Compatible with Delta trim |
| Moen 3372 | CC/IPS | Brass | Rough-in valve | $90 | 3-function with shared flow |
| Kohler K-728-K-NA | 1/2″ NPT | Brass | Rough-in | $125 | Anti-scald pressure balance |
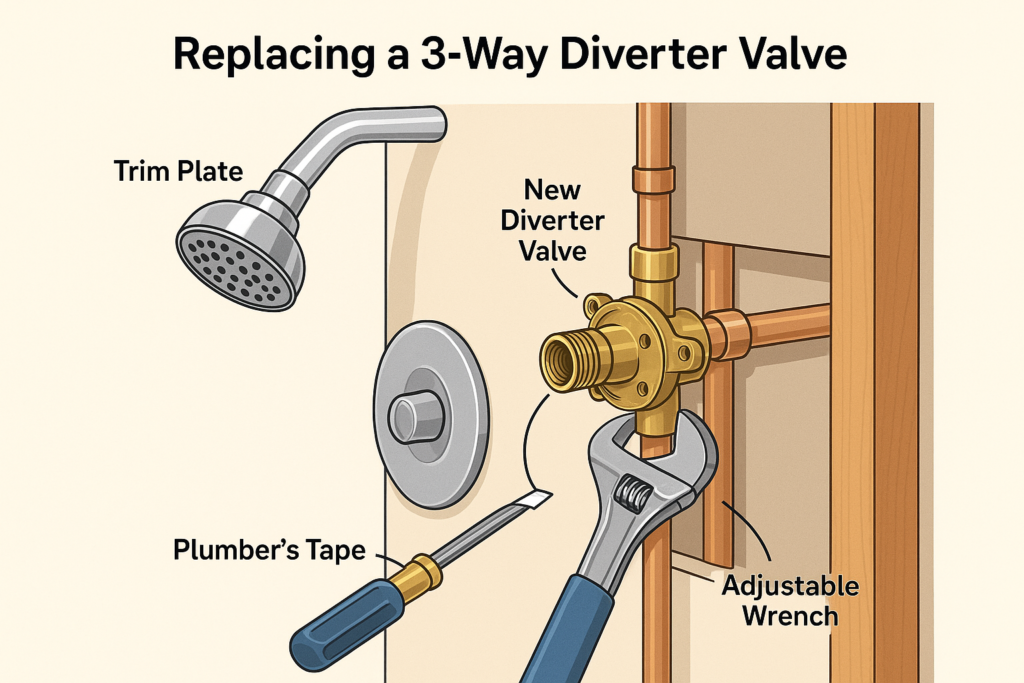
Step-by-Step Example: Replacing a 3-Way Diverter Valve
Let’s say you have a Delta R11000 and need to replace it because one outlet no longer works.
What You’ll Need:
Find a replacement for diverter valve
- New Delta R11000 diverter valve
- Screwdrivers
- Adjustable wrench
- Plumber’s tape
- Utility knife
- Safety gloves and glasses
Step 1: Turn Off Water Supply
Shut off the main water line. Drain residual water from the shower.
Step 2: Remove Trim and Handle
- Use a screwdriver to remove the shower handle.
- Carefully take off the trim plate using a utility knife to cut caulk.
Step 3: Access the Valve
If there’s no rear panel access, cut a square portion of drywall behind the shower using a drywall saw.
Step 4: Disconnect the Old Valve
- Use an adjustable wrench to loosen pipe fittings.
- If it’s soldered, use a pipe cutter or heat the joints to remove it.
Step 5: Install the New Valve
- Wrap threads with plumber’s tape.
- Secure the valve using wrenches or solder it into place (if copper).
- Check for proper alignment of outlets (showerhead, handheld, tub).
Step 6: Test Water Flow
Turn water back on and test each setting. Check for leaks.
Step 7: Reinstall Trim or Patch Wall
Replace the trim plate and caulk it. Patch and paint drywall if needed.
Tips to Avoid Future Issues
- Install a water softener to prevent lime scale
- Clean your showerhead monthly
- Exercise the diverter valve weekly
- Replace the cartridge every 5–10 years depending on use
Find a replacement for diverter valve
Final Thoughts
A faulty diverter valve is a common reason for a stopped-up shower. Fortunately, with a few tools and some patience, you can fix or replace it yourself. However, if plumbing feels overwhelming or there’s no wall access, hiring a licensed plumber is the safer bet.
Replacing a 3-way diverter valve like the Delta R11000 or Moen 3372 costs under $200 DIY or up to $500 with professional help. Whether you DIY or outsource, this repair restores full control of your shower’s functions and can significantly improve your daily routine.
Affiliate Disclosure:
This post may contain affiliate links. If you click on a link and make a purchase, we may earn a small commission at no extra cost to you. As an Amazon Associate, we earn from qualifying purchases. We only recommend products that we genuinely believe will add value to our readers.
About me:
Hi, I’m sujith , a passionate content creator and DIY enthusiast. I simplify home improvement topics, from plumbing fixes to smart gadgets, helping everyday people solve real problems without always calling in the pros. Whether you’re a beginner or seasoned DIYer, you’ll find honest guides, tool reviews, and step-by-step tutorials right here. Join me on this journey to make your home smarter—one project at a time.